Docker Development Environment with X11-forwarding/GUI containing OpenCV, Miniconda and Jupyter Lab

We do want a good development environment and sometimes do need to visualize the output or even the files we are dealing with inside of a docker container.

When you run the container upon building it should launch the Jupyter Lab firefox based development environment.

You can find the Dockerfile.bionic.gui contents at the bottom of this page. The setup will be for a conda python development environment with OpenCV and Jupyter notebooks. The main idea is that the GUI applications can be launched from within containers and captured on the display of the host system using X11 forwarding.

1. Pre-requisite

The Docker file contains the following packages

Docker & GUI X11 forwarding

2. Build this Docker Image

DOCKER_BUILDKIT=1 docker build --rm -f Dockerfile.bionic.gui -t ubuntu-dev:cuda10.1-ubuntu18 . 

3. Run this Docker Image

docker run --rm -it --gpus all --privileged --net=host --ipc=host -e DISPLAY=$DISPLAY -v /tmp/.X11-unix:/tmp/.X11-unix --volume=$PWD:/home/jdoe/workspace -p 58080:8080 --name ubuntu-dev ubuntu-dev:cuda10.1-ubuntu18 

Dockerfile.bionic.gui

FROM nvidia/cuda:10.1-cudnn7-devel-ubuntu18.04


LABEL \
	maintainer="Rahul" \
    build="DOCKER_BUILDKIT=1 docker build --rm -f Dockerfile.bionic.gui -t ubuntu-dev:cuda10.1-ubuntu18 . " \
	install="docker run --rm -it --gpus all --privileged --net=host --ipc=host -e DISPLAY=$DISPLAY -v /tmp/.X11-unix:/tmp/.X11-unix --volume=$PWD:/home/jdoe/workspace -p 58080:8080 --name ubuntu-dev ubuntu-dev:cuda10.1-ubuntu18 bash"


RUN apt-get update && apt-get install -y -qq firefox git    \
            build-essential tar wget bzip2 unzip curl       \
            git net-tools vim tmux rsync sudo less cmake    \
            x11-apps libxext-dev libxrender-dev libxtst-dev \
            libcanberra-gtk-module libcanberra-gtk3-module  \
            libgtk2.0-dev libgtk-3-dev pkg-config           \
            libavformat-dev libavcodec-dev libavfilter-dev  \ 
            libjpeg-dev libpng-dev libtiff-dev edisplay     \
            libswscale-dev zlib1g-dev libopenexr-dev        \
            libeigen3-dev libtbb-dev libtbb2                \
            libv4l-dev libxvidcore-dev libx264-dev          \
            gfortran libatlas-base-dev ffmpeg               \
            libgstreamer-plugins-base1.0-dev                \
            libgstreamer1.0-dev libprotobuf-dev             \
            python3-dev python3-numpy       
#            libopencv-dev python3-opencv

# -------------- 1. Configure Environment --------------

ENV SHELL=/bin/bash             \
    NB_USER=jdoe                \
    NB_UID=1000                 \
    NB_GID=1000                 \
    LANGUAGE=en_US.UTF-8        
ENV HOME=/home/$NB_USER
ENV CONDA_HOME=$HOME/miniconda 

# ------------- 2. Prepare OS User --------------

RUN mkdir -p /home/${NB_USER} && \
    echo "${NB_USER}:x:${NB_UID}:${NB_GID}:${NB_USER},,,:/home/${NB_USER}:/bin/bash" >> /etc/passwd && \
    echo "${NB_USER}:x:${NB_UID}:" >> /etc/group && \
    echo "${NB_USER} ALL=(ALL) NOPASSWD: ALL" > /etc/sudoers.d/${NB_USER} && \
    chmod 0440 /etc/sudoers.d/${NB_USER} && \
    chown ${NB_UID}:${NB_GID} -R /home/jdoe

RUN sh -c 'echo "/usr/local/lib64" >> /etc/ld.so.conf.d/opencv.conf' && \
    sh -c 'echo "/usr/local/lib"   >> /etc/ld.so.conf.d/opencv.conf'

# ------------- 3. Install Conda ----------------

USER $NB_USER 
WORKDIR $HOME/

# Install miniconda to CONDA_HOME=/miniconda
RUN curl -LO http://repo.continuum.io/miniconda/Miniconda3-latest-Linux-x86_64.sh
RUN bash Miniconda3-latest-Linux-x86_64.sh -p $CONDA_HOME -b
RUN rm Miniconda3-latest-Linux-x86_64.sh
ENV PATH=$CONDA_HOME/bin:/usr/local/bin/:${PATH}       

# Python packages from conda
RUN conda update -y conda && conda init bash                       && \
    conda config --env --set always_yes true                       && \
    conda create -y -n pydev Python=3.7 pip tqdm pandas            \ 
                             pillow requests scikit-image          \
                             jupyterlab opencv matplotlib          && \
    echo ". $CONDA_HOME/etc/profile.d/conda.sh" >> $HOME/.bashrc   && \ 
    echo "conda activate pydev" >> $HOME/.bashrc

ENV PATH=$CONDA_HOME/envs/pydev/bin:$PATH 

# ------------- 4. Install Opencv ----------------
# OpenCV 3.4.7   : wget --quiet https://github.com/opencv/opencv/archive/3.4.7.zip -O opencv.zip
# OpenCV Contrib : wget --quiet https://github.com/opencv/opencv_contrib/archive/3.4.7.zip -O opencv_contrib.zip

ENV CV_VERSION="3.4.7" 
RUN wget https://github.com/opencv/opencv/archive/$CV_VERSION.zip -O opencv.zip   && \ 
    unzip opencv.zip && cd opencv-$CV_VERSION/ && mkdir -p build && cd build      && \
    cmake -D CMAKE_BUILD_TYPE=RELEASE               \
          -D CMAKE_INSTALL_PREFIX=/usr/local        \
          -D WITH_EIGEN=OFF                         \
          -D INSTALL_C_EXAMPLES=ON                  \
          -D INSTALL_PYTHON_EXAMPLES=ON             \
          -D OPENCV_GENERATE_PKGCONFIG=ON           \
          -D BUILD_opencv_python3=ON                \
          -D BUILD_opencv_python2=ON                \
          -D PYTHON3_LIBRARY=$CONDA_HOME/lib/python3.8                         \
          -D PYTHON3_INCLUDE_DIR=$CONDA_HOME/include/python3.8m                \
          -D PYTHON3_EXECUTABLE=$CONDA_HOME/bin/python                         \
          -D PYTHON3_PACKAGES_PATH=$CONDA_HOME/lib/python3.8/site-packages     \
          -D DENABLE_PRECOMPILED_HEADERS=OFF                                   \
          -D BUILD_EXAMPLES=ON ..                                           && \
    make -j$(nproc) && sudo make install && sudo ldconfig 
RUN rm opencv.zip

# RUN conda install -y -c pytorch pytorch torchvision 
RUN wget https://www.linuxtechi.com/wp-content/uploads/2014/11/docker-150x150-1.jpg
CMD jupyter lab

Reference

Realsense 435i (Depth & RGB) Multi Camera Setup and OpenCV-Python wrapper (Intel RealSense SDK 2.0 Compiled from Source on Win10)

Issue

multiple Realsense depth camera’s appear to be accessible from different source identifiers/locations (especially using DirectShow on windows). I am not interested in hardware sync so will be using an enforced timestamp to associate with the capture.

Intel RealSense Depth Camera D435i: https://www.intelrealsense.com/depth-camera-d435i

Ref: https://dev.intelrealsense.com/docs/multiple-depth-cameras-configuration

Intel RealSense SDK 2.0 codehttps://github.com/IntelRealSense/librealsense

I installed the RealSense SDK 2.23.0 version for my Windows 10 environment. Looks like all the example projects in github focus on C++. However we have wrapper python examples which does provide the stuff we need.

Build Python wrapper and tests using CMake & Visual Studio on Windows 10

Build the RealSense python wrapper from source code

CmakeLibrealsenseCapture

Source: https://github.com/IntelRealSense/librealsense/tree/master/wrappers/python

  1. Git clone the librealsense2 source code
  2. Install Visual Studio Community edition for compiling the source
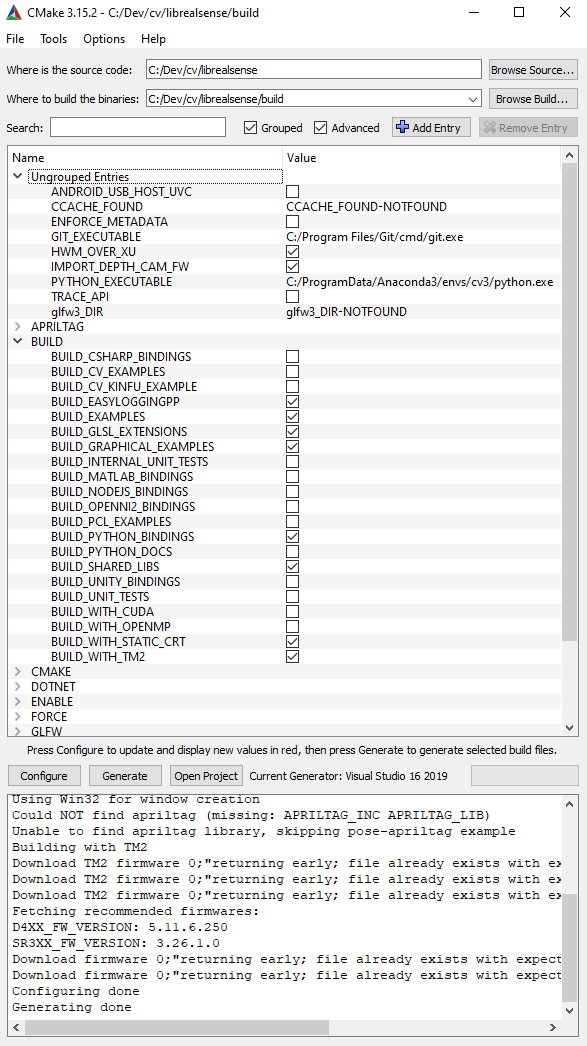
  3. Run CMake Gui “cmake-gui.exe”.
  4. “Browse Source” and configure the path. Example “C:/Dev/librealsense”
  5. Create “build” folder on librealsense path folder. Click “Browse Build” button and configure the path. Example “C:/Dev/librealsense/build”.
  6. Check on “Grouped” and “Advanced” checkbox
  7. Click “Configure” button.
  8. On “Specify the generator for this project”, Select “Visual Studio 16 2019”
  9. Then click “Finish” button.
  10. After configuration is done, on “BUILD” node, check “BUILD_PYTHON_BINDINGS” checkbox button.
  11. Then click “Configure” button again.
  12. In “Ungrouped Entries”, identify variable “PYTHON_EXECUTABLE”, and change the path to anaconda python.exe in your virtual environment path as
    “C:/Python3/python.exe” or “C:/ProgramData/Anaconda3/envs/cv3/python.exe”
  13. Then click “Generate” button, after all is done, click “Open Project”.
  14. Alternately, open Visual Studio IDE, select the librealsense2.sln solution and build all in Release or Debug mode.
  15. The libraries are built and available in folder c:/Dev/librealsense/build/Release if you built in Release mode
    1.  cp pybackend2.cp35-win_amd64.pyd pybackend2.pyd
    2.  cp pyrealsense2.cp35-win_amd64.pyd pyrealsense2.pyd
  16. Copy the libraries to the relevant environment
    1. copy “pybackend2.pyd”, “pyrealsense2.pyd” and “realsense2.dll” to “DLLs” folder. Example “C:/ProgramData/Anaconda3/envs/cv3/DLLs”
    2. copy “realsense2.lib” to “libs” folder. Example “C:/ProgramData/Anaconda3/envs/cv3/libs”
  17. Test the python bindings and realsense libraries
    1. Activate your Anaconda environment. Example: conda activate cv3
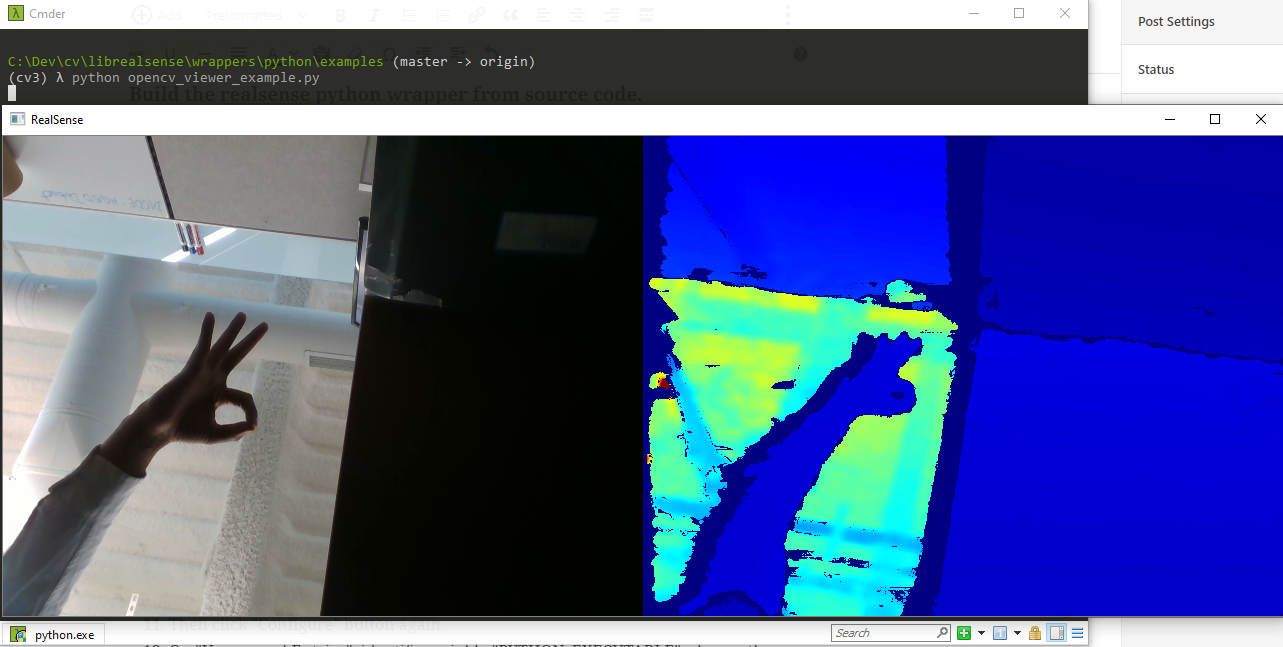
    2. Test the python opencv RGB & Depth visualization code and see the results as per the image below

Test Example: Opencv RGB & Depth viewer

cd C:/Dev/librealsense/wrappers\python\example
python opencv_viewer_example.pyRealSenseTestCapture


Now lets write a test code for Multiple Camera Setup

Test 1: enlist all the devices

import pyrealsense2 as rs
import numpy as np
import cv2

DS5_product_ids = ["0AD1", "0AD2", "0AD3", "0AD4", "0AD5", "0AF6", "0AFE", "0AFF", "0B00", "0B01", "0B03", "0B07","0B3A"]
def find_device_that_supports_advanced_mode() :
    ctx = rs.context()
    ds5_dev = rs.device()
    devices = ctx.query_devices()
    print("D: ", devices)
    devs = []
    for dev in devices:
        if dev.supports(rs.camera_info.product_id) and str(dev.get_info(rs.camera_info.product_id)) in DS5_product_ids:
            if dev.supports(rs.camera_info.name):
                print("Found device that supports advanced mode:", dev.get_info(rs.camera_info.name), " -> ", dev)
                devs.append(dev)
    #raise Exception("No device that supports advanced mode was found")
    return devs

devs = find_device_that_supports_advanced_mode()

Results

(cv3) λ python senserealtest.py
D:  <pyrealsense2.device_list object at 0x00000237B1C3B688>
Found device that supports advanced mode: Intel RealSense D435I  ->  <pyrealsense2.device: Intel RealSense D435I (S/N: 843112070672)>
Found device that supports advanced mode: Intel RealSense D435I  ->  <pyrealsense2.device: Intel RealSense D435I (S/N: 843112070632)>
Found device that supports advanced mode: Intel RealSense D435I  ->  <pyrealsense2.device: Intel RealSense D435I (S/N: 843112070689)>

Test 2: Stream images from all the devices and show

Use a device manager helper class from boxdimensioner multicam example project. Also look at the fix provided for an issue observed in device manager class.

import pyrealsense2 as rs
import numpy as np
import cv2

from realsense_device_manager import DeviceManager

def visualise_measurements(frames_devices):
    """
    Calculate the cumulative pointcloud from the multiple devices
    Parameters:
    -----------
    frames_devices : dict
    	The frames from the different devices
    	keys: str
    		Serial number of the device
    	values: [frame]
    		frame: rs.frame()
    			The frameset obtained over the active pipeline from the realsense device
    """
    for (device, frame) in frames_devices.items():
        color_image = np.asarray(frame[rs.stream.color].get_data())
        text_str = device
        cv2.putText(color_image, text_str, (50,50), cv2.FONT_HERSHEY_PLAIN, 2, (0,255,0) )
        # Visualise the results
        text_str = 'Color image from RealSense Device Nr: ' + device
        cv2.namedWindow(text_str)
        cv2.imshow(text_str, color_image)
        cv2.waitKey(1)


# Define some constants 
resolution_width = 1280 # pixels
resolution_height = 720 # pixels
frame_rate = 15  # fps
dispose_frames_for_stablisation = 30  # frames

try:
    # Enable the streams from all the intel realsense devices
    rs_config = rs.config()
    rs_config.enable_stream(rs.stream.depth, resolution_width, resolution_height, rs.format.z16, frame_rate)
    rs_config.enable_stream(rs.stream.infrared, 1, resolution_width, resolution_height, rs.format.y8, frame_rate)
    rs_config.enable_stream(rs.stream.color, resolution_width, resolution_height, rs.format.bgr8, frame_rate)

    # Use the device manager class to enable the devices and get the frames
    device_manager = DeviceManager(rs.context(), rs_config)
    device_manager.enable_all_devices()
    
    # Allow some frames for the auto-exposure controller to stablise
    while 1:
        frames = device_manager.poll_frames()
        visualise_measurements(frames)

except KeyboardInterrupt:
    print("The program was interupted by the user. Closing the program...")

finally:
    device_manager.disable_streams()
    cv2.destroyAllWindows()

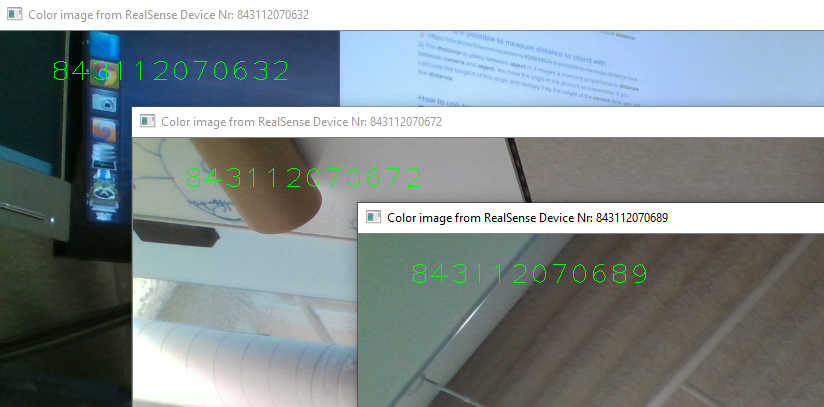
Results

This will show you multiple windows, one for each camera connected to the system

MultiCamCapture

That should be good for today !!!

References can be found at the following places:


Similar Steps are needed to build this on Ubuntu 18.04 with CUDA and existing Python environment.

sudo apt-get install git cmake libssl-dev freeglut3-dev libusb-1.0-0-dev pkg-config libgtk-3-dev unzip -y
rm -f ./master.zip

wget https://github.com/IntelRealSense/librealsense/archive/master.zip
unzip ./master.zip -d .
cd ./librealsense-master

echo Install udev-rules
sudo cp config/99-realsense-libusb.rules /etc/udev/rules.d/
sudo udevadm control --reload-rules && sudo udevadm trigger
mkdir build && cd build
cmake -DFORCE_LIBUVC=true -DCMAKE_BUILD_TYPE=release            \
        -D BUILD_WITH_CUDA=true                                 \
        -D PYTHON_EXECUTABLE=/opt/conda/bin/python              \
        -D PYTHON_LIBRARY=/opt/conda/lib/python3.7              \
        -D PYTHON_INCLUDE_DIR=/opt/conda/include/python3.7m     \
        -D PYTHON_EXECUTABLE=/opt/conda/bin/python              \
        -D BUILD_PYTHON_BINDINGS=true                           \
        -D BUILD_NODEJS_BINDINGS=true                           \
        -D BUILD_EXAMPLES=true                                  \
        -D BUILD_GRAPHICAL_EXAMPLES=true                        \
        ../
make -j$(nproc)
sudo make install

Brokerless ZeroMq to share live image/video data stream from Raspberry PI B+ (Uses OpenCV)

Makes sure you have the following :

  1. OpenCV 3.x compiled and installed on Rasbperry Pi
  2. Raspberry Pi B+ with Raspbian and a USB webcam attached

ZeroMQ

Read through ZeroMQ in 100 words for a brief description

zmq

Installationhttp://zeromq.org/bindings:python


Code

Now lets go through the simple code I wrote for publishing and subscribing to live webcam stream from a raspberry PI to a workstation.


Make sure you have the dependencies and imports as below

import os, sys, datetime
import json, base64

import cv2
import zmq
import numpy as np
import imutils
from imutils.video import FPS


“”” Publish “””

  • In this piece of code we are creating a Zero MQ context preparing to send data to ‘tcp://localhost:5555’
  • The opencv API for camera is used to capture a frame from the device in 640×480 size
  • FPS module is used from opencv to estimate the frame rate for this capture
  • The byte buffer read from the webcam is encoded and sent as a string over the Zero MQ TCP socket connection
  • Continue to send each buffer out on the TCP socket
def pubVideo(config):
    context = zmq.Context()
    footage_socket = context.socket(zmq.PUB)
    # 'tcp://localhost:5555'
    ip = "127.0.0.1"
    port = 5555
    target_address = "tcp://{}:{}".format(ip, port) 
    print("Publish Video to ", target_address)
    footage_socket.connect(target_address)
    impath = 0 # For the first USB camera attached
    camera = cv2.VideoCapture(impath)  # init the camera
    camera.set(cv2.CAP_PROP_FRAME_WIDTH, 640)
    camera.set(cv2.CAP_PROP_FRAME_HEIGHT, 480)
    print("Start Time: ", datetime.datetime.now())
    fps = FPS().start()
    while True:
        try:
            buffer = capture(config, camera)
            if not isinstance(buffer, (list, tuple, np.ndarray)):
                break
            buffer_encoded = base64.b64encode(buffer)
            footage_socket.send_string(buffer_encoded.decode('ascii'))
            # Update the FPS counter
            fps.update()
            cv2.waitKey(1)
        except KeyboardInterrupt:
            # stop the timer and display FPS information
            fps.stop()
            print("[INFO] elasped time: {:.2f}".format(fps.elapsed()))
            print("[INFO] approx. FPS: {:.2f}".format(fps.fps()))
            camera.release()
            cv2.destroyAllWindows()
            print("\n\nBye bye\n")
            break
    print("End Time: ", datetime.datetime.now())


“”” Subscribe “””

  • The ZeroMQ subscriber is listening on ‘tcp://*:5555’ 
  • As the string is received its decoded and converted to image using OpenCv
  • We use OpenCV to visualize this frame in a window
  • Every frame sent over the ZeroMQ TCP socket is visualized and appears as a live video stream
def subVideo(config):
    context = zmq.Context()
    footage_socket = context.socket(zmq.SUB)
    port = 5555
    bind_address = "tcp://*:{}".format(port) # 'tcp://*:5555'
    print("Subscribe Video at ", bind_address)
    footage_socket.bind(bind_address)
    footage_socket.setsockopt_string(zmq.SUBSCRIBE, str(''))
    while True:
        try:
            frame = footage_socket.recv_string()
            img = base64.b64decode(frame)
            npimg = np.fromstring(img, dtype=np.uint8)
            source = cv2.imdecode(npimg, 1)
            cv2.imshow("image", source)
            cv2.waitKey(1)
        except KeyboardInterrupt:
            cv2.destroyAllWindows()
            print("\n\nBye bye\n")
            break

Github: https://github.com/vishwakarmarhl/cnaviz/blob/master/imcol/CvZmq.py


Run

In the github code above, you can run the test as follows,

PUB: Webcam source machine

python CvZmq.py pub --pubip=127.0.0.1 --pubport=5555

SUB: Target visualization machine

python CvZmq.py sub --subport=5555


Compile and Setup OpenCV 3.4.x on Ubuntu 18.04 LTS with Python Virtualenv for Image processing with Ceres, VTK, PCL

OpenCV: Open Source Computer Vision Library

Links

Documentation: https://docs.opencv.org/3.4.2/

OpenCV Source: https://github.com/opencv/opencv

OpenCV_Logo

A. Setup an external HDD/SSD for this setup

filesystem-partition-ubuntu-external-ssd

B. Environment (Ubuntu 18.04 LTS)


Python3 setup

Install the needed packages in a python virtualenv. Refer similar windows Anaconda setup or look at the ubuntu based info here

sudo apt-get install -y build-essential cmake unzip pkg-config 
sudo apt-get install -y ubuntu-restricted-extras
sudo apt-get install -y python3-dev python3-numpy
sudo apt-get install -y git python3-pip virtualenv
sudo pip3 install virtualenv
rahul@karma:~$ virtualenv -p /usr/bin/python3 cv3
Already using interpreter /usr/bin/python3
Using base prefix '/usr'
New python executable in /home/rahul/cv3/bin/python3
Also creating executable in /home/rahul/cv3/bin/python
Installing setuptools, pkg_resources, pip, wheel...
done.

Activate and Deactivate the python Environment

rahul@karma:~$ source ~/cv3/bin/activate
(cv3) rahul@karma:~$ python
Python 3.6.5 (default, Apr 1 2018, 05:46:30) 
[GCC 7.3.0] on linux
Type "help", "copyright", "credits" or "license" for more information.
>>> print("Test",4*5)
Test 20
>>> exit()
(cv3) rahul@karma:~$ deactivate
rahul@karma:~$ 

Alternatively, a great way to use virtualenv is to use Virtualenvwrappers

sudo pip3 install virtualenv virtualenvwrapper

Add these to your ~/.bashrc file

# virtualenv and virtualenvwrapper
export WORKON_HOME=$HOME/.virtualenvs
export VIRTUALENVWRAPPER_PYTHON=/usr/bin/python3
source /usr/local/bin/virtualenvwrapper.sh

Now, run “source ~/.bashrc” to set the environment

Create a Virtual environment
rahul@karma:~$ mkvirtualenv cv3 -p python3
Already using interpreter /usr/bin/python3
Using base prefix '/usr'
New python executable in /home/rahul/.virtualenvs/cv3/bin/python3
Also creating executable in /home/rahul/.virtualenvs/cv3/bin/python
Installing setuptools, pkg_resources, pip, wheel...done.
virtualenvwrapper.user_scripts creating /home/rahul/.virtualenvs/cv3/bin/predeactivate
virtualenvwrapper.user_scripts creating /home/rahul/.virtualenvs/cv3/bin/postdeactivate
virtualenvwrapper.user_scripts creating /home/rahul/.virtualenvs/cv3/bin/preactivate
virtualenvwrapper.user_scripts creating /home/rahul/.virtualenvs/cv3/bin/postactivate
virtualenvwrapper.user_scripts creating /home/rahul/.virtualenvs/cv3/bin/get_env_details
(cv3) rahul@karma:~$
Activate/Deactivate virtual env
rahul@karma:~$ workon cv3
(cv3) rahul@karma:~$ deactivate 
rahul@karma:~$

Install basic packages for the computer vision work.

(cv3) rahul@karma: pip install numpy scipy scikit-image scikit-learn  
pip install imutils pyzmq ipython matplotlib
pip install dronekit==2.9.1 future==0.15.2 monotonic==1.2 pymavlink==2.0.6

Java installation from this blog

sudo add-apt-repository ppa:linuxuprising/java
sudo apt update
sudo apt install oracle-java10-installer
sudo apt install oracle-java10-set-default sudo apt-get install ant
Packages needed for OpenCV and others
GTK support for GUI features, Camera support (libv4l), Media Support (ffmpeg, gstreamer) etc. Additional packages for image formats mostly downloaded form the ubuntu-restricted-extra repository


sudo apt-get install -y libjpeg-dev libpng-dev libtiff-dev ffmpeg
sudo apt-get install -y libjpeg8-dev libjasper-dev libpng12-dev libtiff5-dev
sudo apt-get install -y libavcodec-dev libavformat-dev libswscale-dev libv4l-dev
sudo apt-get install -y libxvidcore-dev libx264-dev libvorbis-dev
sudo apt-get install -y libgtk2.0-dev libgtk-3-dev ccache imagemagick
sudo apt-get install -y liblept5 leptonica-progs libleptonica-dev
sudo apt-get install -y qt5-default libgtk2.0-dev libtbb-dev
sudo apt-get install -y libatlas-base-dev gfortran libblas-dev liblapack-dev 
sudo apt-get install -y libdvd-pkg libgstreamer-plugins-base1.0-dev
sudo apt-get install -y libmp3lame-dev libtheora-dev
sudo apt-get install -y libxine2-dev libv4l-dev x264 v4l-utils
sudo apt-get install -y libopencore-amrnb-dev libopencore-amrwb-dev

# Optional dependencies
sudo apt-get install -y libprotobuf-dev protobuf-compiler
sudo apt-get install -y libgoogle-glog-dev libgflags-dev
sudo apt-get install -y libgphoto2-dev libeigen3-dev libhdf5-dev doxygen


VTK for SFM Modules

SFM setup: https://docs.opencv.org/3.4.2/db/db8/tutorial_sfm_installation.html

sudo apt-get install libxt-dev libglew-dev libsuitesparse-dev
sudo apt-get install tk8.5 tcl8.5 tcl8.5-dev tcl-dev

Ceres-Solver: http://ceres-solver.org/installation.html

# However, if you want to build Ceres as a *shared* library, 
# You must, add the following PPA:
sudo add-apt-repository ppa:bzindovic/suitesparse-bugfix-1319687
sudo apt-get update
sudo apt-get install libsuitesparse-dev
git clone https://ceres-solver.googlesource.com/ceres-solver
cd ceres-solver
mkdir build && cd build
export CXXFLAGS="-std=c++11" 
cmake ..
make -j4
make test
sudo make install

LAPACK

sudo apt-get install libblas-dev libblas-doc liblapacke-dev liblapack-doc


VTK Setup, https://gitlab.kitware.com/vtk/vtk.git

Configure and build with QT support

git clone git://vtk.org/VTK.git VTK
cd VTK
mkdir VTK-build
cd VTK-build
CXXFLAGS="-std=c++11" cmake ../ -DBUILD_SHARED_LIBS=ON -DBUILD_TESTING=ON \
-DCMAKE_BUILD_TYPE=Release \
-DQT_QMAKE_EXECUTABLE:PATH=/usr/bin/qmake \
-DVTK_Group_Qt:BOOL=ON \
-DBUILD_SHARED_LIBS:BOOL=ON \
-DVTK_WRAP_PYTHON=ON  \
-DPYTHON_EXECUTABLE=~/.virtualenvs/cv3/bin/python 
make -j4
sudo make install
$ cp -r ~/cv/VTK/VTK-build/lib/python3.6/site-packages/* ~/.virtualenvs/cv3/lib/python3.6/site-packages/
$ export LD_LIBRARY_PATH="$LD_LIBRARY_PATH:/usr/lib:/usr/local/lib"
$ sudo ldconfig

FLANN

http://www.cs.ubc.ca/research/flann/#download
cd flann-1.8.4-src/ && mkdir build && cd build
cmake ..
make -j4 
sudo make install

PCL

Download: http://www.pointclouds.org/downloads/linux.html

sudo apt-get install -y libusb-1.0-0-dev libusb-dev libudev-dev
sudo apt-get install -y mpi-default-dev openmpi-bin openmpi-common 
sudo apt-get install -y libboost-all-dev libpcap-dev  sudo apt-get install -y libqhull* libgtest-dev sudo apt-get install -y freeglut3-dev pkg-config sudo apt-get install -y libxmu-dev libxi-dev sudo apt-get install -y mono-complete sudo apt-get install -y openjdk-8-jdk openjdk-8-jre
git clone https://github.com/PointCloudLibrary/pcl 
# https://github.com/PointCloudLibrary/pcl/archive/pcl-1.8.1.tar.gz 
cd pcl && mkdir build && cd build 
CXXFLAGS="-std=gnu++11" cmake -DBUILD_apps=ON \
 -DBUILD_apps_point_cloud_editor=ON \
 -DBUILD_apps_cloud_composer=ON \
 -DBUILD_apps_modeler=ON \
 -DBUILD_apps_3d_rec_framework=ON \
 -DBUILD_examples=ON ..
make -j8 
sudo make install

Official OpenCV installation

wget -O opencv.zip https://github.com/opencv/opencv/archive/3.4.2.zip
wget -O opencv_contrib.zip https://github.com/opencv/opencv_contrib/archive/3.4.2.zip
unzip opencv.zip
unzip opencv_contrib.zip

In case of Raspberry PI 3 B+, this blog worked for me.

Link: https://www.pyimagesearch.com/2016/04/18/install-guide-raspberry-pi-3-raspbian-jessie-opencv-3/


Configure OpenCV with CMake
$ cd ~/cv/opencv-3.4.2 && mkdir build && cd build
$ CXXFLAGS="-std=c++11" cmake -D CMAKE_BUILD_TYPE=RELEASE \
-D CMAKE_INSTALL_PREFIX=/usr/local \
-D INSTALL_PYTHON_EXAMPLES=ON \
-D INSTALL_C_EXAMPLES=OFF \
-D BUILD_opencv_java=OFF \
-D OPENCV_EXTRA_MODULES_PATH=~/cv/opencv_contrib-3.4.2/modules \
-D WITH_TBB=ON \
-D WITH_V4L=ON \
-D WITH_QT=ON \
-D WITH_OPENGL=ON \
-D WITH_VTK=ON \
-D WITH_GTK3=ON \
-D PYTHON_EXECUTABLE=~/.virtualenvs/cv3/bin/python \
-D BUILD_EXAMPLES=ON ..
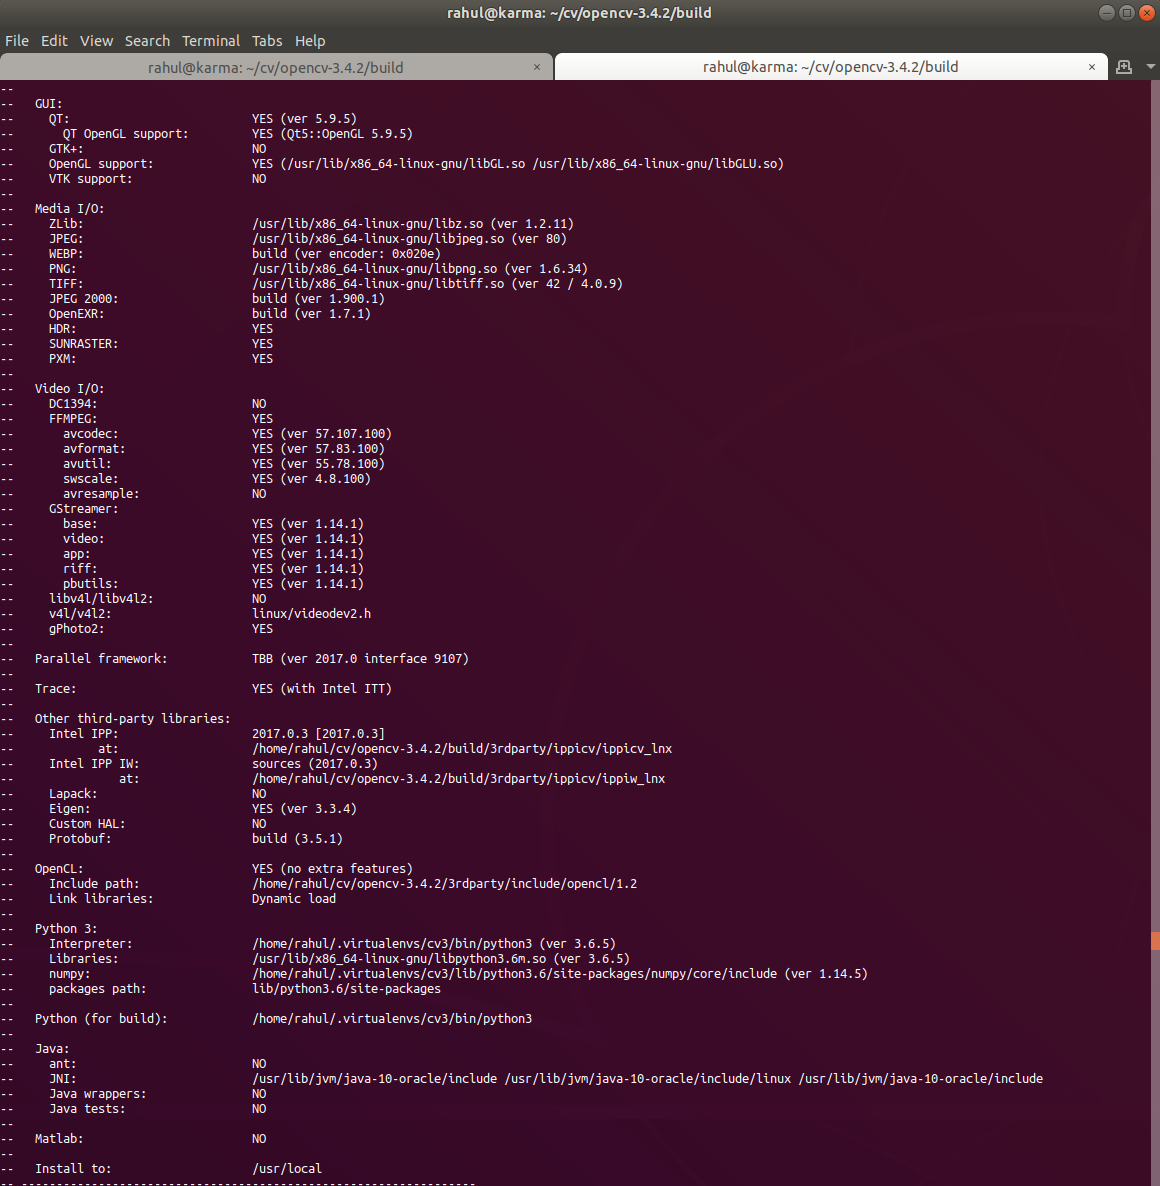
Screenshot from 2018-07-12 13-18-55

Make sure the Python 3 interpreter and other dependencies are configured correctly.

Compiling with CUDA (Setup instructions)

cmake -D CMAKE_BUILD_TYPE=RELEASE \
-D CMAKE_INSTALL_PREFIX=/usr/local \
-D INSTALL_PYTHON_EXAMPLES=ON \
-D INSTALL_C_EXAMPLES=ON \
-D BUILD_NEW_PYTHON_SUPPORT=ON \
-D OPENCV_EXTRA_MODULES_PATH=~/cv/opencv_contrib-3.4.2/modules \
-D WITH_TBB=ON \
-D WITH_V4L=ON \
-D WITH_QT=ON \
-D WITH_OPENGL=ON \
-D WITH_VTK=ON \
-D WITH_GTK3=ON \
-D PYTHON_EXECUTABLE=~/.virtualenvs/cv3/bin/python \
-D WITH_CUDA=ON \
-D ENABLE_FAST_MATH=1 \
-D CUDA_FAST_MATH=1 \
-D WITH_CUBLAS=1 \
-D BUILD_EXAMPLES=ON ..


Compile, Install and Verify
(cv3) rahul@karma:~/cv/opencv-3.4.2/build$ make -j4
$ sudo make install
$ sudo sh -c 'echo "/usr/local/lib" >> /etc/ld.so.conf.d/opencv.conf'
$ sudo ldconfig
$ pkg-config --modversion opencv
Setup the cv shared libraries
(cv3) rahul@karma$ ls -l /usr/local/lib/python3.6/site-packages
total 5172
-rw-r--r-- 1 root staff 5292240 Jul 12 13:32 cv2.cpython-36m-x86_64-linux-gnu.so
# or use the find command 
$ find /usr/local/lib/ -type f -name "cv2*.so"
$ cd /usr/local/lib/python3.6/site-packages/
$ mv cv2.cpython-36m-x86_64-linux-gnu.so cv2.so
$ cd ~/.virtualenvs/cv3/lib/python3.6/site-packages/
$ ln -s /usr/local/lib/python3.6/site-packages/cv2.so cv2.so

C. Test

(cv3) rahul@karma:~$ python
Python 3.6.5 (default, Apr 1 2018, 05:46:30) 
[GCC 7.3.0] on linux
Type "help", "copyright", "credits" or "license" for more information
>>> import cv2
>>> cv2.__version__
'3.4.2'
>>> exit()
(cv3) rahul@karma:~$

Done.